One of the first things new users often realize when they start mapping in Ace is that THEY WANT MORE!!!! More trees, more furniture, different walls, new flowers, etc. After scouring around for just the right tiles and amassing a large collection, they are suddenly faced with the “What now?” moment. How exactly do you get all these lovely, lovely tiles put together and into Ace?
This tutorial is designed to help new users learn how to combine all those wonderful pieces together to make their perfect tileset. This tutorial uses Gimp 2.8 which, to my knowledge, is the most recently released version. I chose Gimp primarily because it is free which is appealing to many users who do not need the full capabilities of Photoshop.
Terminology[]
Before we start, let’s take a moment to review a bit of common RM terminology. Common terms are typically used as follows:
Tile – An individual graphic.
Tilesheet – A “page” of combined graphics. In Ace, there 9 separate sheets. A1-A5 are five different sheets and B-E are four more separate sheets.
Tileset – A combination of Tilesheets used to create a map. A full complete set would often consist of sheets A1-A5 and B-E, although
For our purposes today, we are going to be discussing Tilesheets B-E. Any of the Tile A sheets have their own set of rules and will be discussed at another time, although many of the techniques in this tutorial still apply.
Getting Started[]
Now we’re ready to start. The first thing you want to do after starting up Gimp is to open up the images you want to combine. In this case I am using Celianna’s Tile E (because I knew it had room to add tiles into) and I will be adding doors from her tavern parallax set. I have opened both of these files in Gimp. Both sets can be found here: http://forums.rpgmakerweb.com/

Create New Image
Another option is to start with a blank image for your Tilesheet. If this is the way you want to go, go to File and New Image. Set the image size to 512 x 512 pixels. Go to Advanced Options and make sure Fill With is set to Transparency.
The next thing I do is turn on the grid for all of the images I am using. For some RPG Maker tasks, you won’t need the grid, but when you are cutting and pasting tiles it is essential. So go on up to View and select Show Grid. Most likely your grid will not be set correctly. You want to have a 32 x 32 pixel grid since this is the basic size of a tile in Ace.
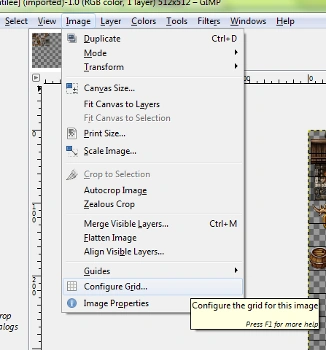
Configure Grid
To change the grid, go to Image and Configure Grid. At the Spacing option, change it to 32 x 32 (making sure it is set to measure in pixels). If you find yourself working with a lot of Ace tiles, you can change the Default Grid settings in Preferences under Edit.
And last before I start cutting and pasting, I turn on Snap to Grid for each image. It is also found under View.
Cutting and Pasting[]
Now that our set up is out of the way, go to the image that contains the tile you want to add. Using the rectangle select tool, select the tile that you want to move. This is where Snap to Grid first comes in handy.

Rectangle Tool to Select
The rectangle select tool will snap to the grid lines, ensuring that you don’t mistakenly leave a row of pixels out or pick up extra pixels from neighboring tiles, which can cause big problems.
Next you want to simply copy your selection. You can do so by going up to edit, by right-clicking or by using the CTRL-C command.
Now, go back to the sheet you are moving the graphics into. Paste the graphics into this sheet (using edit, right-click or CTRL-V). The graphics should be floating as a separate layer in the middle of the sheet. You can move them to their new home on the sheet by moving your mouse over the pasted layer until it turns into a 4-directional arrow. You can also choose the 4-directional arrow from the toolbox.
Drag the selection to its new home on your tilesheet. Remember how you set Snap to Grid earlier? This is the other moment when it comes in super handy. When you move the tiles to where you want them, they will snap into place, ensuring that your tiles will not be misaligned when you go to create your map in Ace.
Saving and Exporting[]
Once you have all of your tiles in place, it is time to save and close. Sometimes in Gimp, even this can be a bit confusing for new users. The first thing I would do is Save As. You’ve created a new tilesheet and don’t want to rewrite the original. So in this case, I am going to save mine as TutorialCombineGraphicsTileE. You can name it whatever you want – perhaps MyGameNameTileE or DwarfsHouseTileE. Give it a good name so that you can easily remember what it is later.
When you save it will be automatically saved in Gimp’s .xcf file format. This is good for now. You want to save an easily editable copy in case you want to add or delete other items (because trust me, you will).
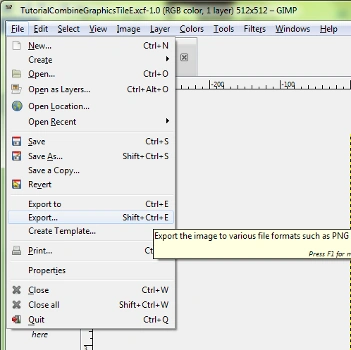
However, .xcf files can’t be used in Ace. So now we need to Export.
Exporting an Image
Go back to File and down to Export. Typically, I export right to the same folder I saved the file in. However, you can also Export directly into the Tilesets folder in the Graphics folder of your game. This will save the step of having to later import the tiles.
Once you’ve exported the file, you are done. If you didn’t export into your game folder, you will need to import it into your game.
Importing Resources Into Ace[]
As I said above, you can export the file directly into your game if you would like. However, sometimes this is not always the best choice. In this case, you will need to get your new tilesheet into Ace.
To do this, you want to go up to Resource Manager. Make sure you have Graphics/Tilesets selected on the left and click Import. Navigate to your exported tilesheet and select it. Click open and you’ve got it.
The last tiny little bit will be to go up to the database and add it to the tileset of your choosing.